Introduction
Avius Agent Studio is a professional WordPress integration plugin that connects OpenAI Agent Builder workflows to websites using ChatKit. It provides full UI control, secure session handling, and no-code configuration.
Visitor → WordPress → Avius Agent Studio → OpenAI Agent → AI Response
OpenAI Setup & Required Keys
Avius Agent Studio connects your WordPress website to OpenAI’s Agent Builder platform. Before using the plugin, you will need a few items from your OpenAI account. The process is straightforward and only needs to be done once.
- An OpenAI account with billing enabled
- An Agent Builder Workflow
- An OpenAI Secret API Key
- A Workflow ID
- A Domain Key (optional but recommended)
Step 1 — Create an OpenAI Account & Enable Billing
Visit https://platform.openai.com and sign up. To use Agent Builder and API features, billing must be enabled. This ensures your workflows can create sessions and respond to users.
Inside the OpenAI dashboard:
• Go to Settings → Billing
• Add a payment method
• Confirm billing activation
Step 2 — Create an Agent Workflow
A workflow is the intelligence behind your assistant. It defines how your AI responds, tools it uses, and its behavior.
OpenAI provides an official guide here:
https://developers.openai.com/api/docs/guides/agent-builder
In summary:
• Go to the Agent Builder section in your OpenAI dashboard
• Click Create Workflow
• Configure prompts, tools, and instructions
• Click Publish once finished
Step 3 — Copy the Workflow ID
After publishing your workflow:
• Click on "<>Code" Menu at the top right corner
• Locate the Workflow ID
• Click the copy icon next to it
You will paste this ID into the Avius Agent Studio settings panel in WordPress.
Step 4 — Generate an OpenAI Secret API Key
The Secret Key allows WordPress to securely communicate with OpenAI.
Inside the OpenAI dashboard:
• Navigate to Projects
• Select or create a project
• Go to API Keys
• Click Create New Secret Key
• Copy the generated key immediately
wp-config.php file instead of the database.
Step 5 — Create a Domain Key (Recommended)
A Domain Key ensures only your website can use your workflow, preventing unauthorized usage.
Inside the OpenAI dashboard:
• Go to Security or Domain Settings
• Add your website domain to the allow list
• Generate the Domain Key
• Copy the key and paste it into the plugin security tab
Final Step — Connect Everything in WordPress
Installation
- Upload plugin ZIP to WordPress.
- Activate via Plugins → Installed Plugins.

Open your WordPress admin panel and navigate to:
Admin Menu → Avius Agent Studio
Here You will Find Different Settings Tab
• General: OpenAi Keys and other Configurations.
• Appearance: Congigure the look of you Chat Window.
• Chatkit UI: Enable/Disable Chatkit UI Features.
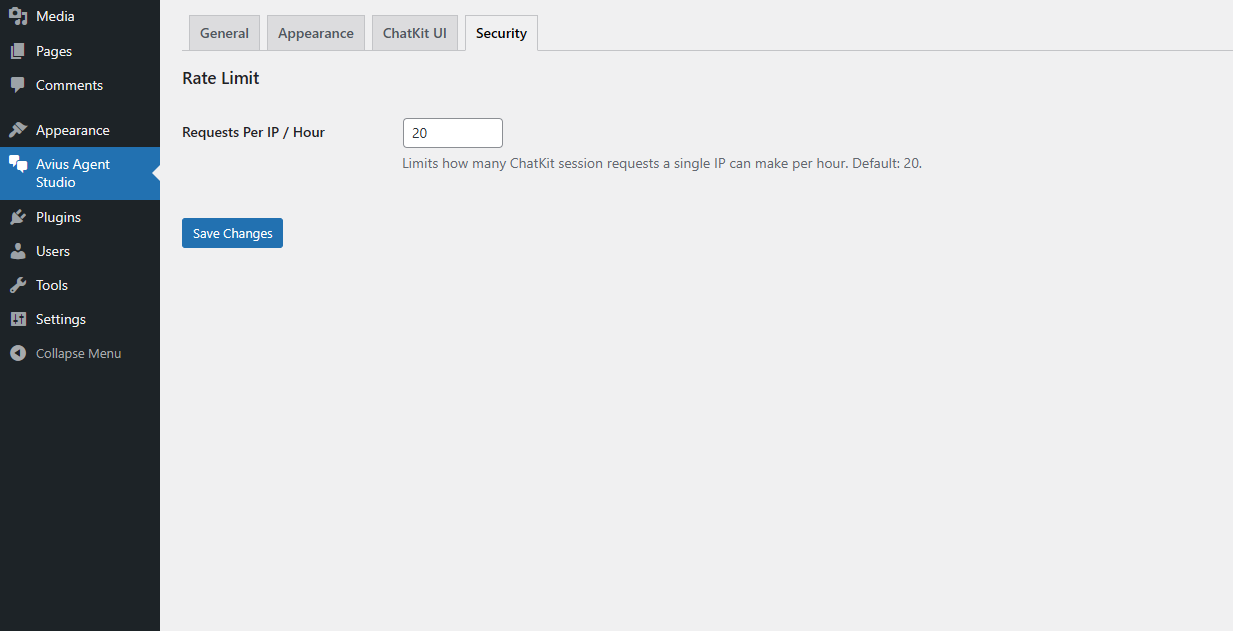
• Security: Define the Rate Limit Per hour of YourApi Key to avoid Misuse.
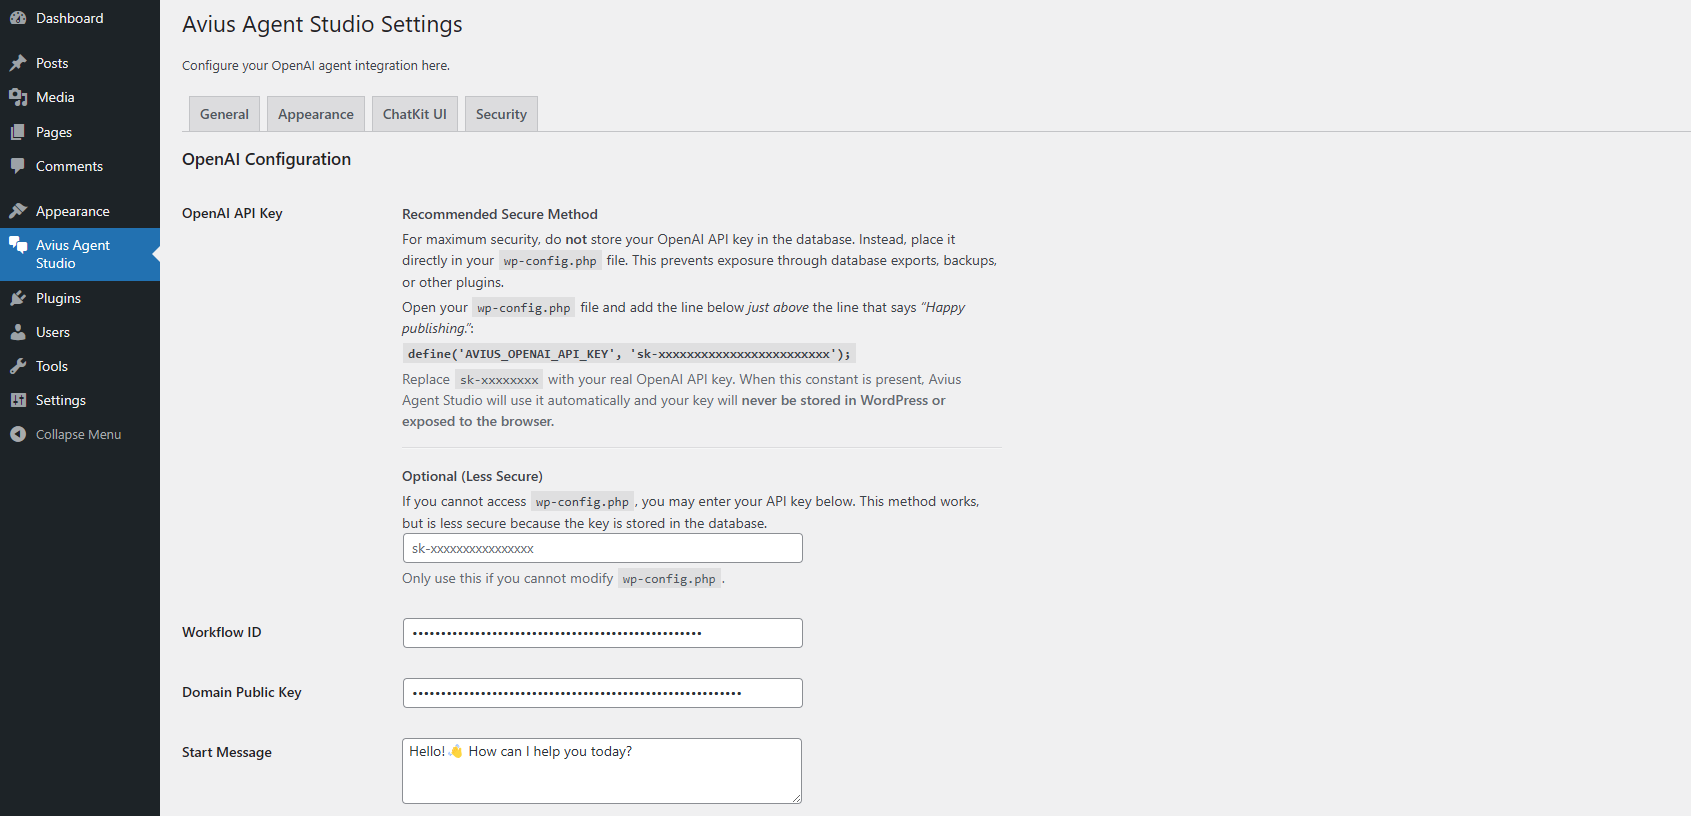
OpenAI API Key Recommended Secure Method
For maximum security, do not store your OpenAI API key in the database. Instead, place it directly in your wp-config.php file. This prevents exposure through database exports, backups, or other plugins.
Open your wp-config.php file and add the line below just above the line that says “Happy publishing.”:
define('AVIUS_OPENAI_API_KEY', 'sk-xxxxxxxx');Paste workflow ID and save settings.
Admin Tabs Overview
General
Launcher Appearance
Chat Window Appearance
ChatKit UI

Security
General Settings
- OpenAI Secret API Key
- Workflow ID Integration
- Domain Key Security
- Enable / Disable Plugin
- Global Activation Toggle
- Default Start Message
- Device Visibility (Desktop / Mobile)
- Page Targeting Rules
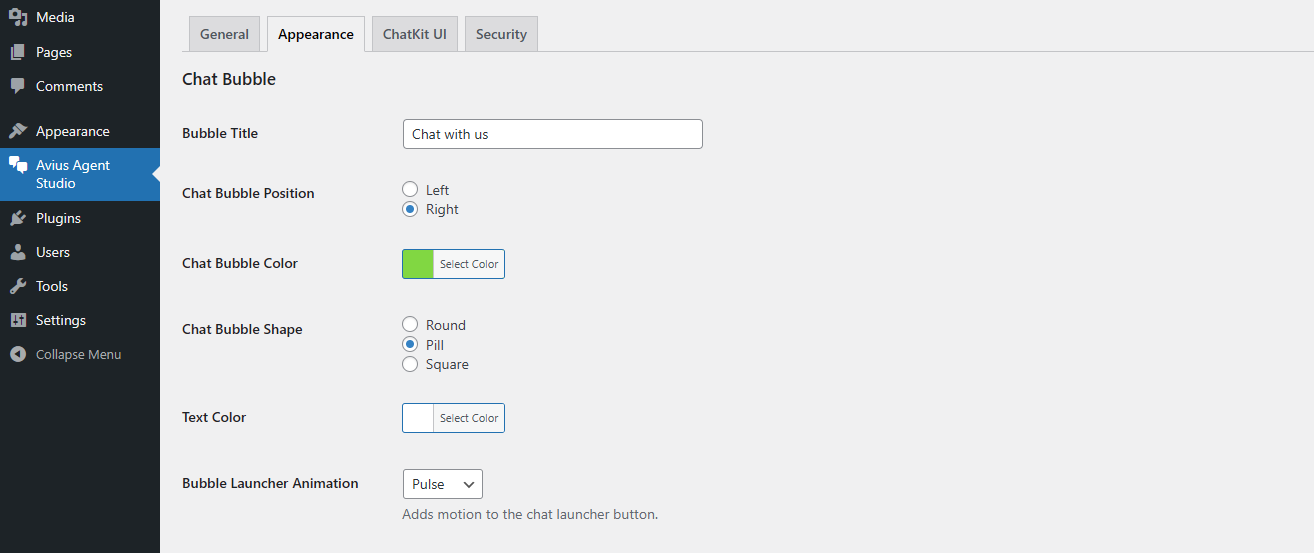
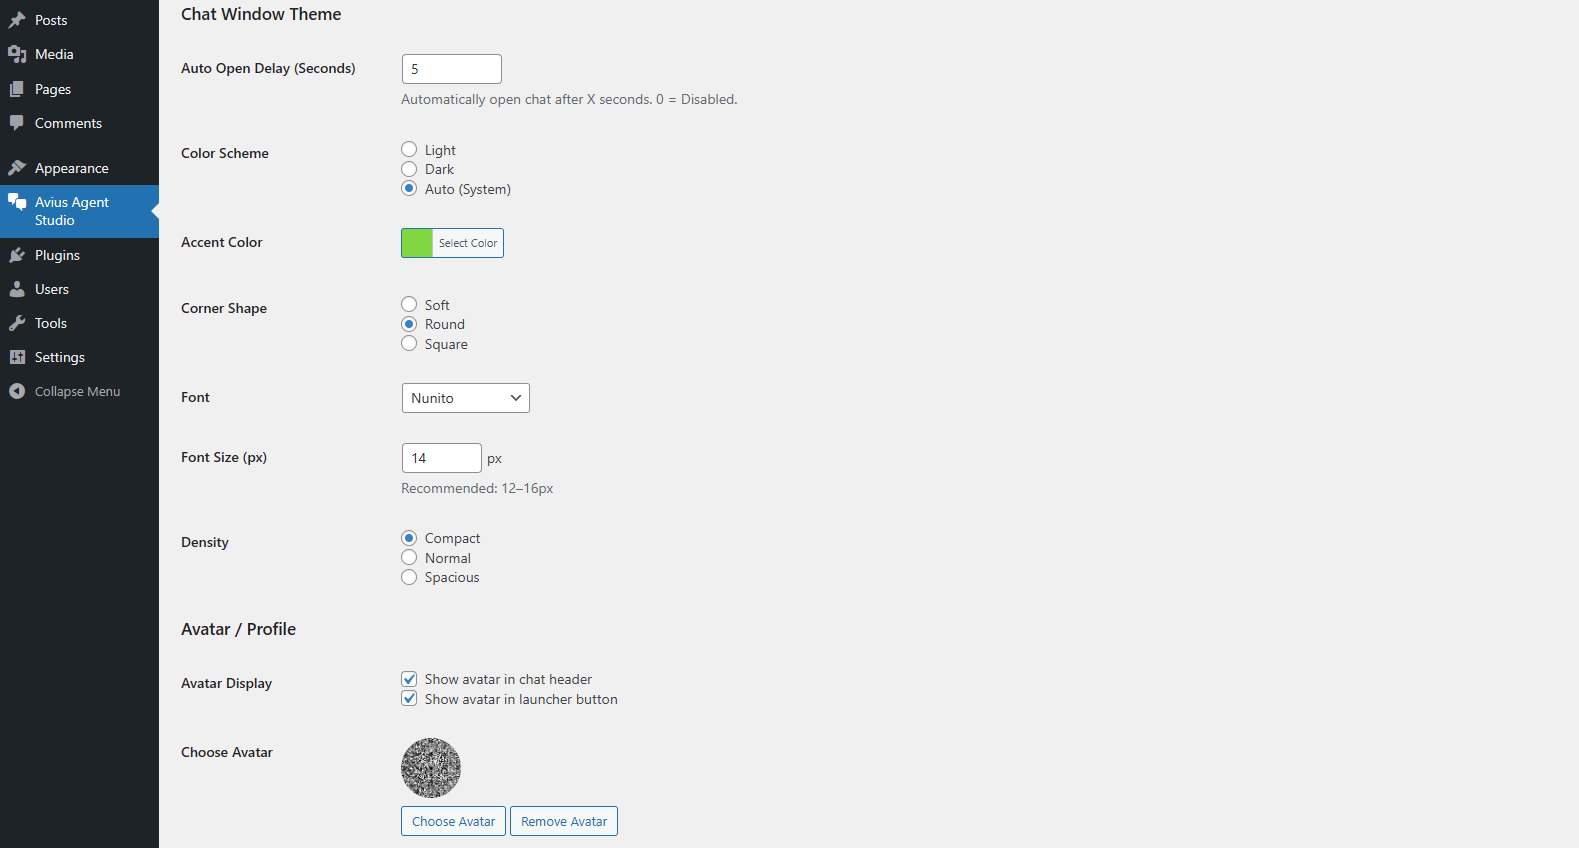
Appearance & Branding
- Chat Bubble Color
- Bubble Position (Left / Right)
- Bubble Size Control
- Launcher Animation Effects
- Header Avatar Upload
- Launcher Avatar Upload
- Theme Color Scheme (Light / Dark / Auto)
- Corner Radius Control
- Font & Density Options
ChatKit Interface Settings
- Header Toggle
- Title Visibility
- History Panel
- Start Prompts
- Composer Placeholder
- Attachments
- Feedback & Retry
- Disclaimer Text
- Conversation Persistence
Security & Protection
- Nonce Verification
- Session Rate Limiting
- API Key Storage Options
- IP-Based Request Limiting
- Domain Allow-List Validation
- Anonymous User Hashing
- Secure REST Endpoint Handling
- Abuse Prevention Controls
Troubleshooting
- Blank Chat Window → Verify that your OpenAI Secret API Key and Workflow ID are correctly entered and saved. Ensure the workflow is Published in OpenAI and not left in Draft mode. Also clear your browser cache and refresh the page.
- 403 / Session Error → Usually caused by nonce verification or expired sessions. Try saving the plugin settings again and refresh the page. If using a caching plugin, exclude the REST endpoint from caching.
-
Attachments Not Uploading →
Confirm that file uploads are enabled in both the plugin settings and your OpenAI ChatKit permissions.
Check server upload limits (
php.ini) if files are large. - Rate Limit Reached → Increase the rate limit value inside the Security tab if legitimate users are being blocked. This feature protects against abuse and bot flooding.
- Bubble Not Showing → Check Display Rules and Device Visibility settings. Ensure the plugin is enabled and not restricted to specific pages.
-
Domain Key Rejection →
Verify your domain is added to the OpenAI allow-list exactly as it appears in the browser
(e.g.,
https://example.comvswww.example.com). -
Slow Response Time →
This can occur if server caching conflicts with REST requests.
Exclude
/wp-json/avius-agent/from caching and ensure your hosting PHP version is 7.4 or higher.
FAQ
Changelog
Version 1.1.5 — Stable
- Improved ChatKit session stability and error handling
- Enhanced REST security validation
- Optimized rate-limiting performance
- Refined launcher animations and UI responsiveness
- Fixed occasional blank chat window issue
- Documentation and visual updates
Version 1.1.0
- Added advanced appearance controls and theme modes
- Introduced page targeting display rules
- Start prompts and greeting message settings
- Attachment and feedback toggles
- Admin panel layout refinements
Version 1.0.x
- Performance optimizations and UI fixes
- Improved mobile display handling
- Enhanced session expiration logic
Version 1.0.0 — Initial Release
- OpenAI Agent Builder workflow integration
- ChatKit UI embedding with customization controls
- Security features including nonce and rate limiting
- Device visibility and page targeting options
- Full documentation and onboarding guide
Support & Resources
Need help or want to see the plugin in action? We provide direct support and a live working demo.
Typical response time: 24–48 hours on business days.